Nearly a year ago, I wrote about sending alerts to Microsoft Teams channel using Qlik load script and REST connector. With the coronavirus sweeping through the world, forcing people in lock-downs, we are seeing surge in the use of collaboration tools such as Microsoft Teams. So, I wanted to expand on this further and send a HTML table as notification to MS Teams channel and send emails using Microsoft Power Automate (Previously known as Flow) to help people get the notifications quicker.
What, Why and How?

Qlik Sense Enterprise provides notification API to monitor and subscribe to changes you wish to track, ex – task updates, app updates, data changes etc. This provides a way to integrate Qlik to other solutions. However, it requires some technical knowledge and understanding of the systems and not always as simple as you would like. These notifications also do not persists after a QRS service reboot, which causes another set of challenges.
I would like to present an alternative to this, where you use the existing knowledge of Qlik load script and REST connector, combined that with Microsoft Power Automate and MS Teams and send notifications to multiple places with no/very little coding.
This method is similar to sending emails using web connector, however this will not require you to provide your credentials anywhere, which makes an ideal solution that can be deployed in many scenarios.
For this demo – I will set up a flow to reload a Qlik Sense Application (provided here) which will retrieve information on reload tasks from your environment and post a message to MS Teams channel and trigger a chain email with the same message to a group of user(s).
Notification Flow
The notification flow looks like this –

- First, using Qlik Sense load script we prepare the table we are going to send in our notification.
- Convert the table into a Qlik variable – this is where we add HTML formatting and prepare the JSON for our webhook call.
- Using Qlik’s REST connector we make a POST request to the MS Teams webhook.
- Power Automate monitors that channel for new messages and send email(s) once MS Teams receives a new message.
MS Teams setup
You will need to set up a webhook connector for the Teams channel where you want to send the notifications to. I have covered this in another blog if you need a refresher. This is all we need to do in Teams.
Power Automate setup
Next, we set up a flow in Power Automate. This will monitor the Teams channel that you will send the notifications to and trigger send email action when any new messages send to that channel.
There are multiple ways we can set this flow –
- Using templates – MS Teams and MS Outlook 365.
- From scratch using SendGrid as an option for sending emails (it’s free service).
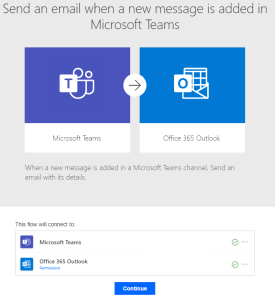
For this blog – I am going to go for the second option, so you are not dependent on outlook permissions and also it will be more generic, suitable for sending email notifications.
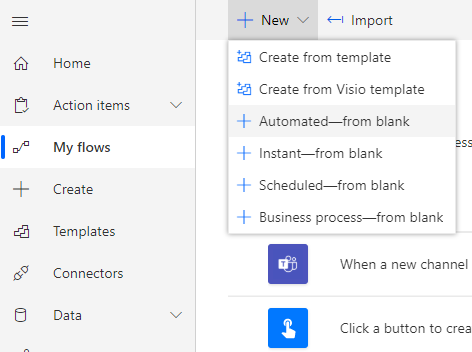
- Navigate to “My Flows” > “New” > “Automated-from blank“.
- You will see a new popup screen. In that popup, fill in “Flow Name” and type “teams” in the search box.
- Select the “When a new channel message is added” option from the list and press “Create“.
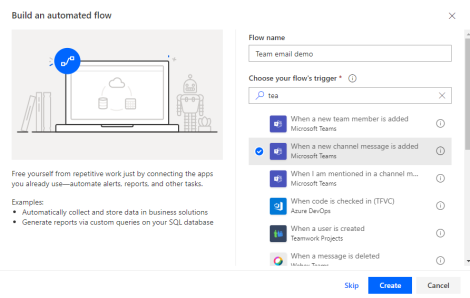
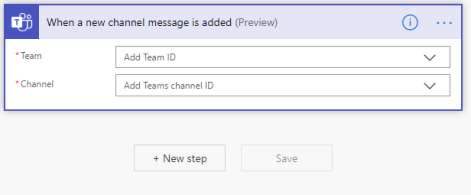
- This will create the flow and open it in edit mode.
- Fill in the “Team” and “Channel” that you wish to monitor for the new message. This will be the channel you have set up the webhook connector for in the Teams setup section above.
- Now Click on “+New step” > Select “Mail” > Select “Send an email notification (v3)“.
Please note: this may prompt you for SendGrid T&C if you have not set another flow using SendGrid before.
- Fill in the To/cc/bcc with the email address(s) where you wish to send the email notifications to.
- Fill in the Subject of your email.
Please Note: you can make this dynamic if you wish to using the Teams message, but for this example, we will just keep it static. - For “Email body” – you can provide HTML or just static text. This is where we will add some dynamic content from the teams message. You can follow the example from the screen shot below. Please make sure you add the “Message Summary” dynamic content as this is what we will be posting form Qlik Sense script to Teams. This will contain the reload summary table.
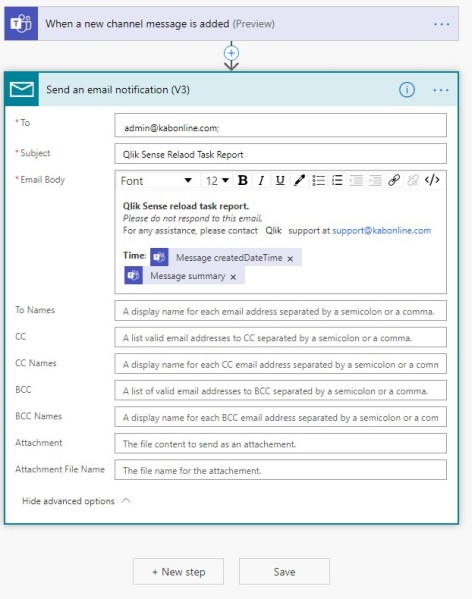
- Once completed, press “Save”.
Please Note: If you run a test and type a normal message in the Teams channel to trigger the task, the email body will not contain the dynamic summary as normal messages do not contain summary. Summary is added when we post the “Action Card” from Qlik Sense to Teams.

This is the hard part done. You can test the automation and when you run the test, you should see something like the picture shown. (Trigger the test by sending a message in that channel chat)
Qlik Sense setup
This part is relatively simple. I have prepared the Qlik Sense application with the script that will load data from the QRS endpoint (like the monitor apps) and prepare the JSON object for the webhook call to the Teams channel.
This app requires three REST connections in total. You only need to create one.(may have to update the second connection, see notes below)
- GET /qrs/about/api/enums
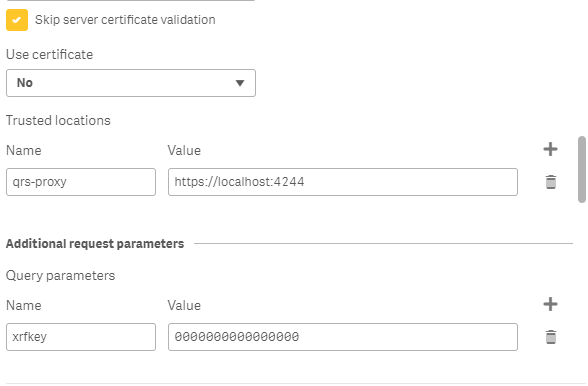
You will need to create this connection with the following name –"GetRestQrsEnums". Look at here (or the screen shots at the bottom of the post) to see how to connect to QRS endpoint if you are not sure. This retrieves the lookup values for status code, which the next part of the code will need. - GET /qrs/reloadtask
You DO NOT need to create this connection. However, if you are using anything other than default virtual proxy for your first connection or for monitor apps then please update the connection parameters in “Task Results” tab @"with connection"section. - POST https://jsonplaceholder.typicode.com/posts
This is a placeholder REST connector that the supplied app comes with. You DO NOT need to create this one. This gets over written by the webhook call using"with connection"statement.
Please download the Qlik Sense application from the link below. This contains the instructions on how to set up the environment.
Final Result
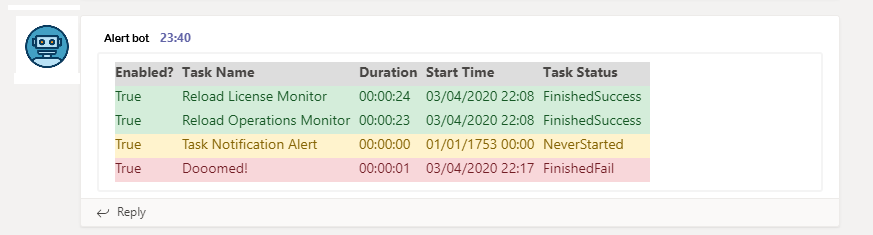
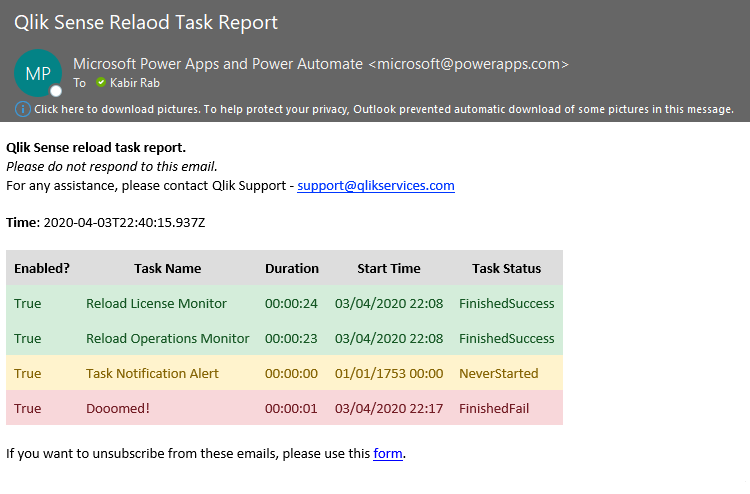
When you have all the components configured correctly, after a successful reload of the Qlik Sense application, you should get two forms of notification.
- An action card posted to MS Teams Channel.
- Few moments later, an email should be delivered to the designated email inboxes.
Finally we got the end of this …..
This should take no longer then 20-30 minutes to set the flow. This opens up number of possibilities, for example – sending KPIs every morning to the users to remind them to log into the Qlik Sense application for details, conditional based email alerting etc. I have started played with flow from a very early days, and the platform has gotten much better over time like most things, it certainly has a lot of potential. If you have not had the opportunity to play with it yet, then this might be the perfect opportunity to take this for a test drive with this exercise.


Thanks for this step by step, it’s amazing to see the advanced Qlik content available in such an intuitive way c:
And i don’t know why.. but i have to remove ‘summary’ and ‘type’ tags from the body message to works.. none menssage is sending to e-mail, but Teams channels post’s is working fine.
LikeLike
Without the summary the PA pipeline wont pick up the message. At the moment there is no out of the box object in power automate to read message body from a action card.
Have you tried putting the power automate on test mode with “your trigger option” and then reload the app? Sometimes power query emails get stuck in the queue and causes delay.
What version of REST connector are you using? Not that would make much difference but i can attempt to recreate the test scenario and debug it.
Regards Kabir
LikeLike
The connector version is 2.21.0;
I don’t think the problem is on PA because the mensagem is not even send to Teams Channel.. Qlik don’t return erros.. the App reloads fine, but nothing happens when i keep the tags ‘type’ and ‘Summary’
LikeLike
hmm strange behaviour indeed. I suspect this is to do with
LET vLoadRestPostPayLoad2 = REPLACE(vLoadRestPostPayLoad,'”‘, CHR(34)&CHR(34));
wondering if you have any special characters in your HTML table that you are forming?
You can create the variable and post it using Postman to the teams channel and see what happens. (If you want to use postman to test the variable, then please remove/comment out this lint – LET vLoadRestPostPayLoad2 = REPLACE(vLoadRestPostPayLoad,'”‘, CHR(34)&CHR(34));
Hope this helps.
Kab
LikeLike
I make more test’s and some research, i think that the problem is the lenght of Summary, in the link below says that summary only can have two lines, and i have a huge number of tasks..
Executing the app with a ‘simples_text_sample’ summary send all the taks to Teams Channel and only the text ‘simples_text_sample’ to e-mail.
Variable:
LET vLoadRestPostPayLoad = ‘{“text”: “‘& vLoadPostBody &'”,”summary”: “‘& ‘small_text_summary’ &'”}’;
Link:
https://docs.microsoft.com/pt-br/microsoftteams/platform/task-modules-and-cards/cards/cards-reference
LikeLike
The link refers to the bot – but I suspect you are correct, there is a limit in summary, but I haven’t seen that in documentations. There are 2 types of card format available, you can try the adaptive card perhaps.
For your issue, you can perhaps split your report into smaller chunks – not ideal but will get all of it through, I have tested with 14 tasks and it was fine. So perhaps break it down by 14 and create a loop.
LikeLike
Nice idea, is a good solution for my problem.
Thanks for all this replays and for the post, will help me a lot 🙂
Just for test i create a failed task named ‘Espe _çiá lidades'(a lot of especial characters) and try send only it as summary, and works for e-mail and Teams Channel.
LikeLike
Glad it worked. Happy to help.
Kab
LikeLike
Kabir,
Any thoughts on using the NPrinting API to do something similar for NPrinting tasks?
LikeLike
Hi,
Yes, you can use NPrinting API and make couple of calls to get all tasks, status and trigger conditions to see if the task failed etc. I currently do not have a NPrinting server VM. When I get some time, I will build one to into this.
Kab
LikeLike
Hi Kabir,
This method returns data succesfully: /qrs/about/api/enums
But this one returns an empty response: /qrs/reloadtask
I suspect the second API call needs elevated permissions? How should I adjust the ‘with connection’ section?
LikeLike
Hi, you will need to make sure the account used for the REST calls have the sufficient level of permissions. You can use rootadmin/contentadmin role for that user on non internet facing dev environment. For production, I would advice to use security rules to only give that user access to the resources they need to see in order to perform these tasks.
If you are not sure on roles and security rules, take a look at Qlik help site. Theres some examples and scenarios to guide you.
LikeLike
Thanks! Got it working. I was using a domain service-account that did not exist in QMC for the data connection. I used a local service-account and with the proper permissions and it works.
LikeLike
Great
LikeLike
Hi , I have configured the same. the only issues i am getting it. Message Summary I am not getting in my email id. in channel I am getting the alert but not in the email box. It is coming without message summary.Could u please help where would i be missing it.
LikeLike
Can you provide what you are posting form Qlik to the REST API and the the context you have added to the email template please? I can investigate and see where its going wrong. I haven’t revisited this since the blog but the set up is still working for us.
LikeLike
impressive. Thanks for this inspiring post
LikeLike
very nice, thank you very much!
LikeLike